The 4-Step Guide to Automating Google Workspace Apps with Google Apps Scripts
Get started automating Google Workspace applications like Gmail, Google Sheets, Google Docs, Google Slides, Google Drive, and more…

I used Google Apps Scripts to automate a 1-hour workflow, reducing manual tasks to an executable script that takes <1 minute to complete from start to finish.
Here’s a demo of a simple Google Doc search and replace workflow that’s been automated with Google Apps Scripts, for a glimpse of what is possible:
View the repo for this script here.
Want Google to handle tedious tasks like this for you? Read on for a 4-Step guide to automating your workflow with Google’s powerful Apps Scripts development platform.
In this article:
Comparing “Google Apps Scripts” and the “Google APIs”
Container-bound Scripts and Standalone Scripts
Step 1: Create your Standalone script
Step 2: Explore the GAS Services
Step 3: Design, Write, and Test your Script
Step 4: Execute your Script Remotely via the Apps Script API
Comparing “Google Apps Scripts” and the “Google APIs”
There are 2 ways to automate Google Workspace apps, the Google APIs and Google Apps Scripts.
I started off my research thinking the Google APIs for each Workspace App (Docs API, Gmail API, etc.) would be quick and easy solutions for my use case: I’d drop custom parameters into a couple JSON request bodies, chain the requests, and supply them as arguments to the APIs. In actuality, my use case demanded more complex operations that would require the development of a stand-alone application if I were to utilize APIs directly:

I didn’t want to embark on developing an entire application for my automation.
I soon found Google Apps Scripts, or GAS, to be the perfect alternative. GAS bills itself as “a rapid application development platform that makes it fast and easy to create business applications that integrate with G Suite.” Using GAS, I didn’t need to build a standalone-application from the ground up. I could simply write a script inside Google’s lightweight IDE to achieve everything I needed.
Container-bound Scripts and Standalone Scripts
There are 2 types of Google Apps Scripts: Container-bound scripts and Standalone scripts. The docs state:
A script is bound to a Google Sheets, Docs, Slides, or Forms file if it was created from that document rather than as a standalone script. The file that a bound script is attached to is called a “container.” Bound scripts generally behave like standalone scripts except that they do not appear in Google Drive, they cannot be detached from the file they are bound to, and they gain a few special privileges over the parent file.
A standalone script is any script that is not bound to a Google Sheets, Docs, Slides, or Forms file or Google Sites. These scripts appear among your files in Google Drive.
My automation plans involved the creation and automation of multiple Google Doc and Slide files. A standalone script was better suited for this use case as it would not make sense to manipulate a Slide file inside of a script bound to a Doc or vice versa, and it would not make sense to execute multiple move and copy operations at several levels of a directory tree from a script bound to a single document nested in one directory.
This article covers the creation, testing, and execution of Standalone scripts, in 4 steps.
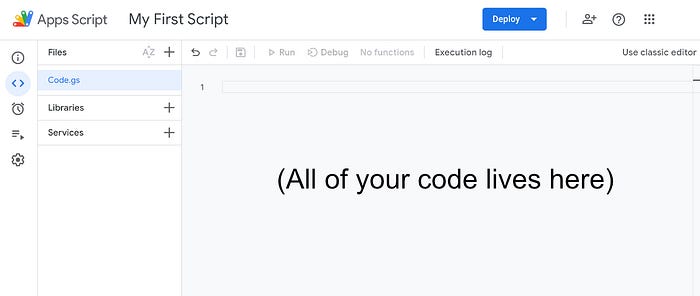
Step 1: Create your Standalone script
From Google:
The easiest way to create a standalone script is to visit
script.google.comand at the top left, click add New project.You can also create standalone scripts from Google Drive. Go to Google Drive and click New > More > Google Apps Script.
Step 2: Explore the GAS Services
You need GAS Services to do more than just log statements.
Google Apps Scripts Services allow you to interact with your data, other Google Systems (like your Workspace Apps), and external systems. These Services are provided as global objects.
An example of a basic Service would be one providing mathematical operations via JavaScript’s standard Math object:
function generateRandomDecimal() {
    return Math.random();
}Logger.log(generateRandomDecimal());
// 0.6227410498963943
You will want to leverage the Advanced Google Services to complete advanced operations on your Google App files:
The advanced services in Apps Script let experienced developers connect to certain public Google APIs with less set-up than using their HTTP interfaces. Advanced services are essentially thin wrappers around those Google APIs.
For example, I am using the Google Docs Document Service to open and create documents, below:
// Open a document by ID.
var doc = DocumentApp.openById('DOCUMENT_ID_GOES_HERE');

// Create and open a document.
doc = DocumentApp.create('Document Name');
Explore the full list of Google Workspace services to discover the available file methods. It should spark ideas as you begin to design your script.
Step 3: Design, Write, and Test your Script
a) Design
After exploring available GAS Services, consider what your use case is and how the Services can be used to accomplish them. It may help to write pseudocode for each function and then replace each step with functioning JS.
function searchReplace() {   // Select document
   // Find all instances of placeholder text
   // Replace all found instances with text supplied as argument}
b) Write
Each GAS Service has thorough documentation and the GAS IDE’s autocomplete functionality works great, making for a developer-friendly experience for script authors.
I found myself starting at the global service object’s documentation, opening a new tab into to the class I needed, down to the method I needed, and so on. I might have had 4 or 5 tabs open to trace the code I needed to complete a desired operation.
// Declare array, get specific table in a Slide deck
var array = ["Golden Retriever", "German Shepherd"]
var table = deck.getSlideById("g117bdcf2640_2_2943").getTables()[0];// Set custom text for a specific cell in the table
table.getCell(1, 0).getText().setText(array[1].toString());
Pay close attention to the Return type and documentation for each method’s returned value. I found when attempting to get all file names using the getFiles() method that what was being returned was a FileIterator class. I could not simple Logger.log(FileIterator) for the file names . Following the documentation for the FileIterator class, I had to iterate over FileIterator like so:
// Log the name of every file in the user's Drive.
var files = DriveApp.getFiles();
while (files.hasNext()) {
  var file = files.next();
  Logger.log(file.getName());
}
For this reason it is valuable to click into each class and method, at least glancing at the documentation at each level.
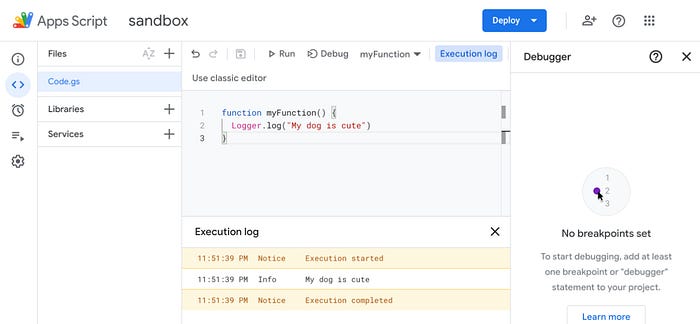
c) Test
You can test out your script by running it normally or in debug mode.
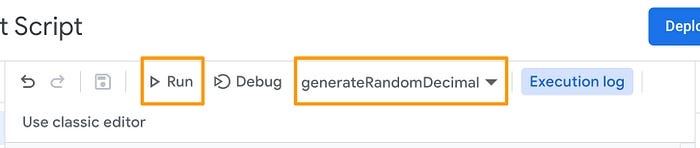
Click the “Run” button after selecting the function you’d like run to run your function normally.
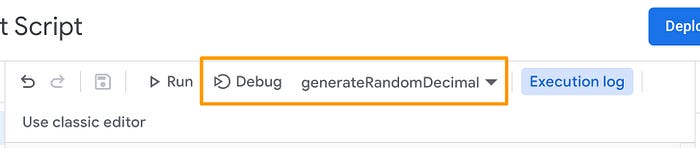
Debug mode will stop the script at any breakpoints you choose to set. Click the “Debug” button after selecting the function you’d like run, to run your function in debug mode.
Running your script via buttons in the UI has 2 drawbacks:
- You cannot supply arguments through the UI (relevant if your function takes arguments/has parameters).
- It is not a mouse-less action, and you will probably be needing to run your function a lot.
This is where remote execution via the App Scripts API will help.
Step 4: Execute your Script Remotely via the Apps Script API
Executing your script remotely with an API testing tool like Postman/Insomnia/curl will allow for execution outside of the the GAS IDE, and speed up your testing if you prefer mouse-less navigation.
This is heftier step, as remote execution requires a Google Cloud Project. We’ll cover 1) GCP configuration and GAS script deployment, and 2) authenticating and crafting your API call.
GCP configuration and GAS script deployment
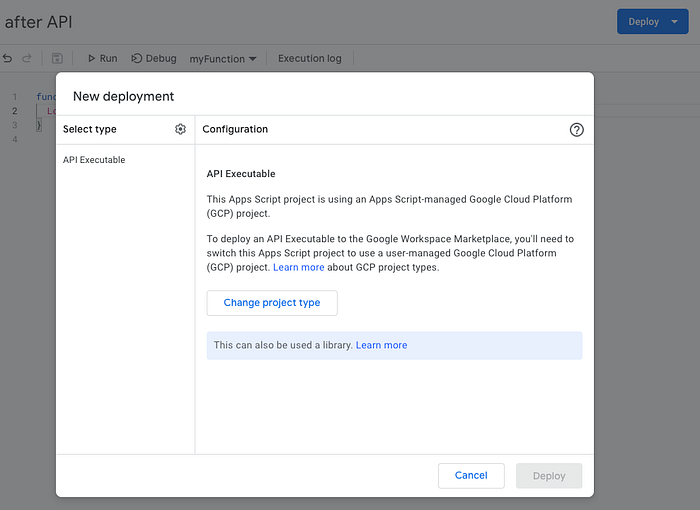
You’ll be shown the message below when when you click “Deploy” in your Apps Script IDE. Click “New deployment”, and select type “API Executable”.
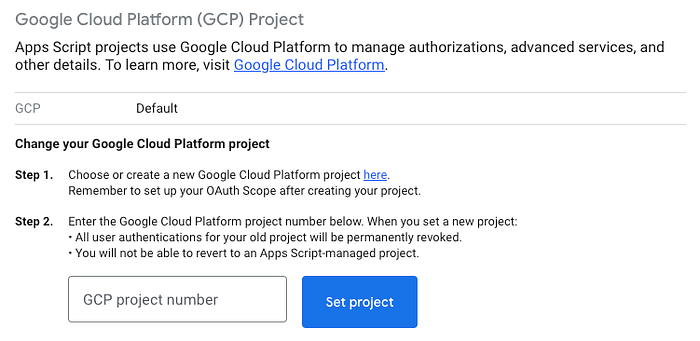
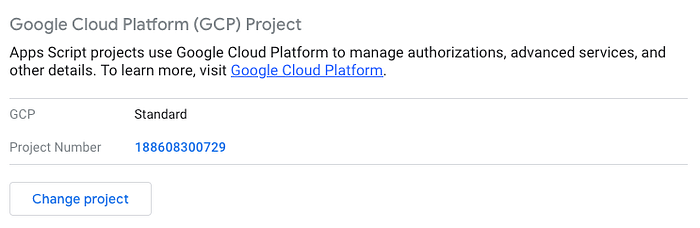
Clicking “Change project type” will lead you to the Project Settings page.

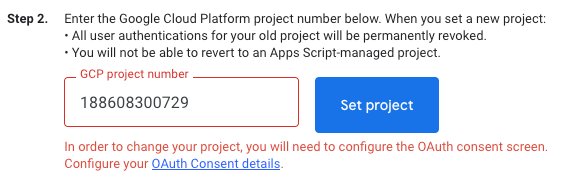
Clicking “Change project” will prompt you to enter an existing Google Cloud Platform project number, which you probably do not have. So, create a new GCP project from the link.
Creating a project will produce a Project Number on your GCP Dashboard. But, if you try and input this on the above view, you will receive the following error.
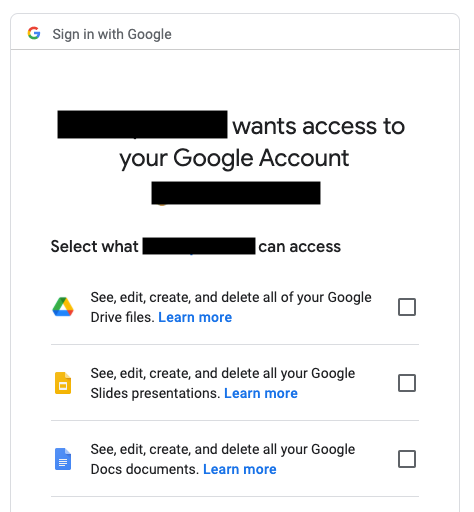
The OAuth consent screen is a prompt that tells users who’s requesting access to their data and what kind of data users are giving access to. You’ve probably seen something like it before when authenticating third-party apps to access your Google services.
Add your App Name, User support email (the account email address will work, and developer contact information.

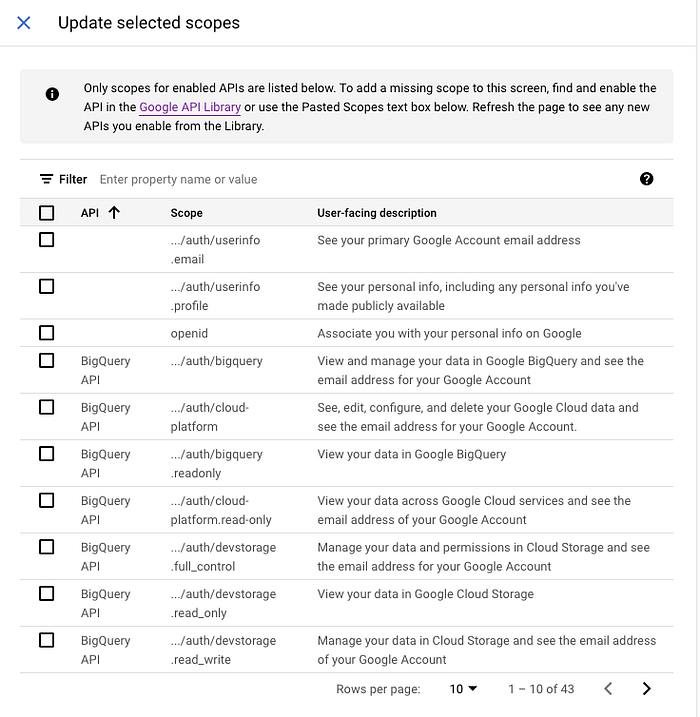
Next, you will add Scopes. Scopes will determine which Google services you request access to, from the user. If your Apps Script uses DocumentApp and the DriveApp service to modify files within those Workspace Apps, then the Scope must include those APIs.
Once you enable the necessary APIs from the Google API Library, the scopes will become available in the list of scopes, for you to select.
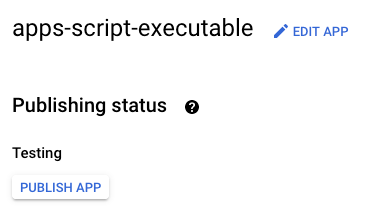
Save and Continue, add your email address as a Test User, and leave the Project in the “Testing” Publishing status.
Now, you will be able to input your Project Number into your Apps Scripts’ Project Settings.
And, you will be able to Deploy your Apps Script as an API Executable, after which you will be provided a Deployment ID and API Executable URL. These details are important as we can use the URL in our API Testing tool to run this script remotely, even adding arguments.
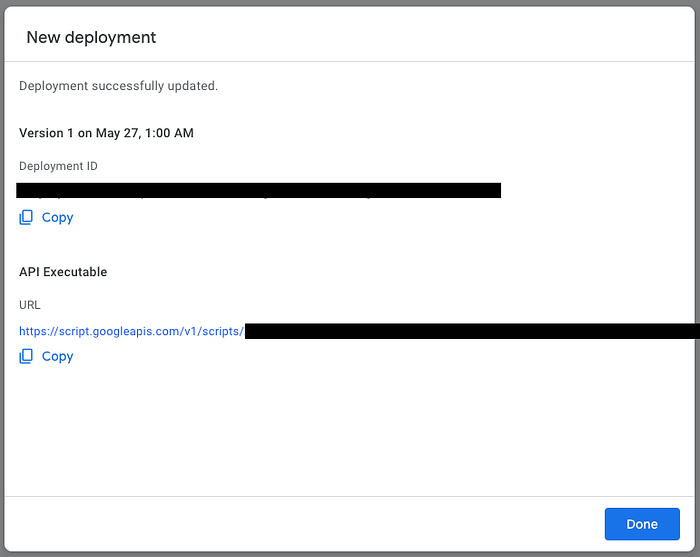
However, these details are solely for this, specific deployment. If we adjust the existing code and save the file, that code will not be executed, as it was not a part of this specific deployment. That is because this is a versioned deployment, not a test deployment.
While in development, you will probably be tinkering with the script quite a bit and deploying every change would be time-consuming. So, click “Test deployments” under “Deploy” and copy the API Executable URL from there — this will allow you to remotely execute the latest saved script. I will discuss authenticating and crafting the API call to execute your GAS script next.
Authenticating and crafting your API call
I am using Postman to execute my script. The Execution API authenticates via Auth 2.0. See my public Postman collection to review my authentication settings.
The POST URL will be the API Executable URL seen earlier.
My request body looks like this:
{
    "function": "main",
    "parameters": [
        {
            "clientName": "Ron",
            "solution": "20 Units",
            "companyName": "Widgt Inc."
        }
    ],
    "devMode": true
}
I’ve set the devMode boolean to true to always execute the most recently saved script.
Sidenote: Using Google Clasp
You can develop Apps Scripts within the IDE, or you can use Google Clasp to develop in your local code editor of choice. This allows you to use version control to push your work to a repo. This is how I was able to create my GAS repo.
Good luck achieving your automation hopes and dreams. Thanks for reading and shoot over any questions on my Twitter @yallcantspell. Visit abeistyping.com for more.